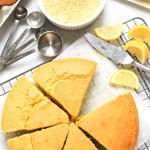
Make this easy lemon curd recipe in under 10 minutes (thanks to the microwave!). It’s perfect for topping yogurt or ice cream, making simple lemon bars, or lemon meringue pie. You can even eat it alone by the spoonful! No matter which way you choose to eat this 5-ingredient lemon curd, it’s going to be one delightful burst of citrus! Naturally gluten-free and dairy-free.
")
Want to save this recipe?
Enter your email & I’ll send it to your inbox. Plus, get great new recipes from me every week!
Jump to:
- The Smell and Taste of Citrus Lemon
- What is Lemon Curd?
- Is Lemon Curd Dairy-Free?
- Microwave Lemon Curd
- Why This Recipe Works:
- Ingredients Required for Lemon Curd
- Ingredient Notes/Substitutions:
- How to Make Lemon Curd (In the Microwave)
- Dish by Dish Tips/Tricks (for the Best Homemade Lemon Curd):
- Recipe FAQs:
- Gluten-Free Lemon Desserts You’ll Love:
- Gluten-Free Desserts to Indulge In:
- Easy Lemon Curd Recipe (Gluten-Free, Dairy-Free)
The Smell and Taste of Citrus Lemon
In the midst of the of summer 2014, Juan and I did a road trip along the Amalfi Coast in Italy. One of my most vivid memories of our trip to Italy was the abundance of lemons literally everywhere.
There were lemon trees heavy with ripe lemons; lemons that had fallen on the ground; the smell of lemons bottled in digestive limoncello (Italy’s signature post-meal digestive drink); the taste of lemons in ice-cold lemon slush that saved us time and again from the unbearably harsh heat; or as part of lemon-scented soap.
In fact I love lemons so much that most of my favorite desserts include lemon in some form.
Here are some of the best lemon recipes on the blog – apparently readers love these too!
Get delicious GLUTEN-FREE recipes each week!
")
What is Lemon Curd?
Lemon curd, in very simple terms, is basically a dessert spread and topping whose main ingredients include egg yolks (or whole eggs), butter sugar, lemon juice, and zest.
It’s one of those things that you’ll be glad to have on hand, because it comes it extremely handy for topping yogurt or ice cream, or making a lemon tart, lemon bars, or even lemon meringue pie.
Is Lemon Curd Dairy-Free?
Since most lemon curd recipes use butter as a main ingredient, it is not usually dairy-free, and not safe for those with lactose intolerances.
However, today we’ll be making a gluten-free and dairy-free lemon curd recipe that even those who are lactose intolerant can enjoy!
Microwave Lemon Curd
I use my microwave multiple times a day – from warming up leftovers for lunch, cooking a chocolate mug cake for one, making microwave peanut butter fudge, to heating up my rice pillow which helps to relieve muscle aches.
So naturally, when I needed some lemon curd a while back, I figured that it should be possible to make my own lemon curd in the microwave as well.
Those who know me know that I like to keep things as simple as possible, and that’s why I can’t wait to share this super easy microwave lemon curd with you. It’s a recipe that I’ve adapted from My Baking Addiction, to make it slightly less sweet and also converted it to be dairy-free.
Why This Recipe Works:
- Just 5 Ingredients: This simple recipe only requires 5 basic ingredients (nothing fancy required)! Since there are so few ingredients involved, I recommend that you use the best quality ingredients you can get your hands on. In this case, make sure you use fresh lemons for the juice and zest (as opposed to bottled lemon juice), fresh eggs, and good quality coconut oil.
- Ready in 10 Minutes: With the help of a microwave, this easy lemon curd is made in just 10 minutes! Which is amazing for when you need a jar of lemon curd in a jiffy! Even if it’s your first time making homemade lemon curd, you don’t have to worry because it’s so easy to make!
- Amazing Flavor: Lemon lovers, this is for you! With an intense tart lemon flavor, this gluten-free curd is sure to be a perfect addition of bright citrus taste to anything you drizzle it on or fill it with.
- Totally Gluten-Free & Dairy-Free: The best part is that this lemon curd is 100% gluten-free and dairy-free, which means that even those with Celiac disease or gluten and lactose intolerances can enjoy it without worries!
Ingredients Required for Lemon Curd
Here’s a visual overview of the ingredients required for this easy lemon curd recipe.
(For exact measurements, please scroll down to the printable recipe card at the bottom of this post.)
")
Ingredient Notes/Substitutions:
- Eggs: Eggs play an essential role in this lemon curd for the color and the texture. I haven’t made this lemon curd recipe without eggs, so I honestly don’t know how it will turn out.
- Sugar: I used white granulated sugar. If you are diabetic or insulin-resistant, I highly recommend that you use granulated monkfruit sweetener (a sugar substitute that is zero-glycemic index).
- Lemon Juice and Zest: Since we’re making lemon curd, the lemon flavor is essential. I prefer using fresh lemon juice and lemon zest for optimal flavor.
- Coconut Oil: I prefer refined coconut oil (because it is more neutral in flavor), as opposed to extra virgin coconut oil (which has a stronger coconut taste and smell). You can also use unsalted dairy-free butter if you prefer. Alternatively, if you’re not lactose-intolerant, you can use butter in place of coconut oil in equal quantities.
- Stovetop Lemon Curd: To make the lemon curd on the stovetop, stir together the eggs, sugar, and lemon zest in a small pot until well-combined with a wooden spoon. Heat the mixture over low heat and once everything is well-combined, add in the coconut oil and lemon juice, and mix well. Make sure to constantly stir the mixture until it thickens (between 5 – 10 minutes). Make sure you do not get distracted as that can make the difference between delicious lemon curd or an eggy mess. Strain the mixture through a fine-mesh sieve to remove any lemon zest.
- Storing: To store, place the cooled dairy-free curd in an airtight container and store for up to 5 days in the refrigerator.
")
How to Make Lemon Curd (In the Microwave)
1. Combine Ingredients in Heatproof Bowl
Combine the sugar and eggs together in a large microwave-proof bowl, and whisk well with a wire whisk until combined. Add the lemon juice, zest, and melted coconut oil together and mix well.
(Tip: Make sure to use a heatproof glass bowl. Do NOT use a metal bowl which is dangerous and can blow up in the microwave, nor a plastic bowl which will melt in the microwave!)
")
2. Cook in Microwave
Cook the lemon mixture on high heat in the microwave for 1-minute intervals, whisking well after each minute. This should take between 3 to 7 minutes, depending on the strength of your microwave.
(Tip: You’ll know the lemon curd is ready once the mixture is thick and coats the back of a metal spoon.)
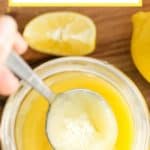
3. Strain the Curd
Strain the gluten-free dairy-free lemon curd through a fine mesh strainer to ensure that it becomes as smooth and silky as possible.
(Tip: Do not skip this step even if you feel lazy, as it is worth the 2 minutes of effort!)
4. Cool Completely Before Storing
Transfer the lemon curd to a glass jar and let it cool completely before covering it with a lid. Store lemon curd in the refrigerator for up to a week.
Dish by Dish Tips/Tricks (for the Best Homemade Lemon Curd):
- Strain the Curd: While straining the cooked curd may take an extra minute or two, it’ll make a big difference to the texture. For best results, I highly recommend straining the curd through a fine-mesh sieve to remove any lemon zest will ensure a smooth and creamy texture.
- Use As Topping: Of course, you can eat this delicious gluten-free lemon curd on it’s own, but it’s also perfect for drizzling a spoonful over yogurt, ice cream, or even granola!
- Use As Filling: You can use this homemade curd as a filling for lemon meringue pie, lemon bars, or even making lemon curd tarts! You can also buy pre-made mini tart crusts and fill them with this gluten-free lemon curd. Feel free to spread this creamy lemon curd between layers of cake to make a lemon blueberry cake.
- Make Lime Curd: If you prefer to use limes instead, go ahead and swap out the lemon juice and zest with equal amounts of lime juice and zest.
Recipe FAQs:
If you don’t have a microwave, don’t worry! You can still make this delicious gluten-free lemon curd on the stovetop. You’ll need a small pot over medium heat and it’ll take slightly longer and require a bit of arm muscle for whisking, but it will still work! Just make sure to keep whisking the ingredients continuously for approximately 10 to 15 minutes until the mixture is thick and coats the back of a spoon.
Just like before, once the dairy-free lemon curd is ready, pass it through a fine-mesh sieve to remove the zest and then transfer it to a glass jar. Allow the curd to cool completely at room temperature before covering it with the lid and storing it in the refrigerator for up to 1 week.
")
Gluten-Free Lemon Desserts You’ll Love:
- Lemon Blueberry Cake (Gluten-Free, Dairy-Free)
- Lemon Meringue Pie (Gluten-Free, Dairy-Free)
- Lemon Poppy Seed Bread (Gluten-Free, Dairy-Free)
- Lemon Poppy Seed Muffins (Gluten-Free, Dairy-Free)
- Moist Lemon Yogurt Cake (Gluten-Free, Dairy-Free)
- Lemon Cornmeal Cake (Gluten-Free)
- No-Bake Lemon Cheesecake (Gluten-Free, Vegan)
- Easy Lemon Muffins (Gluten-Free, Dairy-Free)
Gluten-Free Desserts to Indulge In:


P.S. If you try this recipe, I’d love for you to leave a star rating below, and/or a review in the comment section further down the page. I always appreciate your feedback. Be sure to check out my entire Recipe Index for all the recipes on the blog. You can also follow me on Pinterest, Facebook or Instagram! Sign up for my Email List to get fresh recipes in your inbox each week!
Print
Easy Lemon Curd Recipe (Gluten-Free, Dairy-Free)
- Total Time: 10 minutes
- Yield: 1 16oz jar 1x
- Diet: Vegan
Description
This is a super easy lemon curd recipe, which you can literally make in under 10 minutes (thanks to the microwave)! It’s perfect for topping yogurt, ice cream, or making simple lemon bars, or a more elaborate lemon meringue pie. You can even eat it alone by the spoonful! No matter which way you choose to eat this lemon curd, it’s going to be one delightful burst of citrus! Naturally gluten-free and dairy-free.
Ingredients
- 3 large eggs
- 2/3 cup granulated sugar
- 1 cup fresh lemon juice (approximately 4-5 lemons)
- 1 tablespoon lemon zest (approximately 3 lemons)
- 1/2 cup of coconut oil
Instructions
- Combine Ingredients in Bowl: Combine the sugar and eggs together in a large microwave-proof bowl, and whisk well until combined. Add the lemon juice, zest, and melted coconut oil together and mix well.
- Cook in Microwave: Cook the mixture on high heat in the microwave for 1-minute intervals, whisking well after each minute. This should take between 3 to 7 minutes, depending on the strength of your microwave. You’ll know the lemon curd is ready once the mixture is thick and coats the back of a metal spoon.
- Strain the Curd: Strain the lemon curd through a strainer to ensure that it becomes as smooth and silky as possible. (Do not skip this step even if you feel lazy, as it is worth the 2 minutes of effort!)
- Cool Completely Before Storing: Transfer the lemon curd to a glass jar and let it cool completely before covering it with a lid. Store lemon curd in the refrigerator for up to a week.
Notes
Eggs: Eggs play an essential role in this lemon curd for the color and the texture. I haven’t made this lemon curd recipe without eggs, so I honestly don’t know how it will turn out.
Sugar: I used white granulated sugar. If you are diabetic or insulin-resistant, I highly recommend that you use granulated monkfruit sweetener (a sugar substitute that is zero-glycemic index).
Lemon Juice and Zest: Since we’re making lemon curd, the lemon flavor is essential. I prefer using fresh lemon juice and lemon zest for optimal flavor.
Coconut Oil: I prefer refined coconut oil (because it is more neutral in flavor), as opposed to extra virgin coconut oil (which has a stronger coconut taste and smell). You can also use unsalted dairy-free butter if you prefer. Alternatively, if you’re not lactose-intolerant, you can use butter in place of coconut oil in equal quantities.
Stovetop Lemon Curd: To make the lemon curd on the stovetop, stir together the eggs, sugar, and lemon zest in a small pot until well-combined with a wooden spoon. Heat the mixture over low heat and once everything is well-combined, add in the coconut oil and lemon juice, and mix well. Make sure to constantly stir the mixture until it thickens (between 5 – 10 minutes). Make sure you do not get distracted as that can make the difference between delicious lemon curd or an eggy mess. Strain the mixture through a fine-mesh sieve to remove any lemon zest.
Storing: To store, place the cooled dairy-free curd in an airtight container and store for up to 5 days in the refrigerator.
Adapted from: My Baking Addiction
This recipe was originally posted in July 2020, but has since been republished to include clearer step-by-step instructions, recipes notes/substitutions.
- Prep Time: 3 mins
- Cook Time: 7 mins
- Category: Desserts
- Method: Microwave
- Cuisine: American


Hi Felicia,
It has always been great and refreshing to revisit this wonderfully simple recipe which never fails to jest up my life. You are right in advising us to bookmark this as a handy recipe to be whipped up anytime one needs a refreshing fill or a jesty craving.
Have a wonderful weekend ahead!
Love always,
Mum
Hi mummy! Yes, this recipe is super easy and with the microwave it literally can be made in just 10 minutes. Anything that is quick and easy is right up my alley 😉 Love you too 🙂
This sounds absolutely lovely, however, is it possible to make it without eggs or with an egg substitute? Being allergic to eggs means this recipe is currently off limits, but I adore lemony things!
Hi Aretha… I’m not sure the lemon curd would still taste like lemon curd without the eggs.. I believe the eggs (particularly the egg yolks) give the lemon curd its custardy texture and taste..!
This seemed interesting – simple and refreshing. I will definitely want to try this recipe to savor the refreshing joy the lemon brings.
Thank you Felicia.
Have a manificient day!
With much love and blessings :))
Mum
Mummy!! This is one of the easiest and fastest recipes to make! I like it on crackers but you can also spread it on toast or eat it straight from the bottle!! 🙂