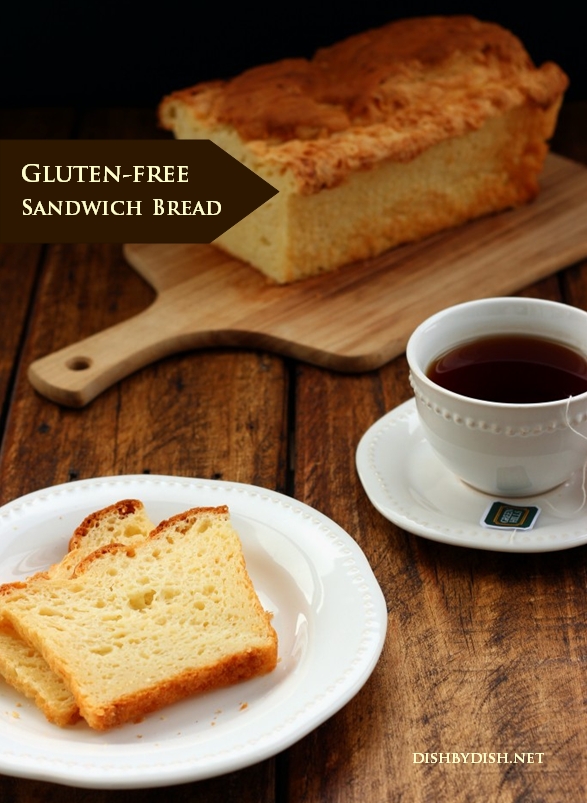
Amazing Gluten-free Sandwich Bread
Hey you! I bring good tidings of joy!!
I’m so excited about today’s recipe that I’m doing a little dance!
Can you tell? Can you tell?
The reason I’m so hyped up and happy is because after a few tries at gluten-free bread, I’ve finally found a recipe that works! Hip hip hooray!
Want to save this recipe?
Enter your email & I'll send it to your inbox. Plus, get great new recipes from me every week!
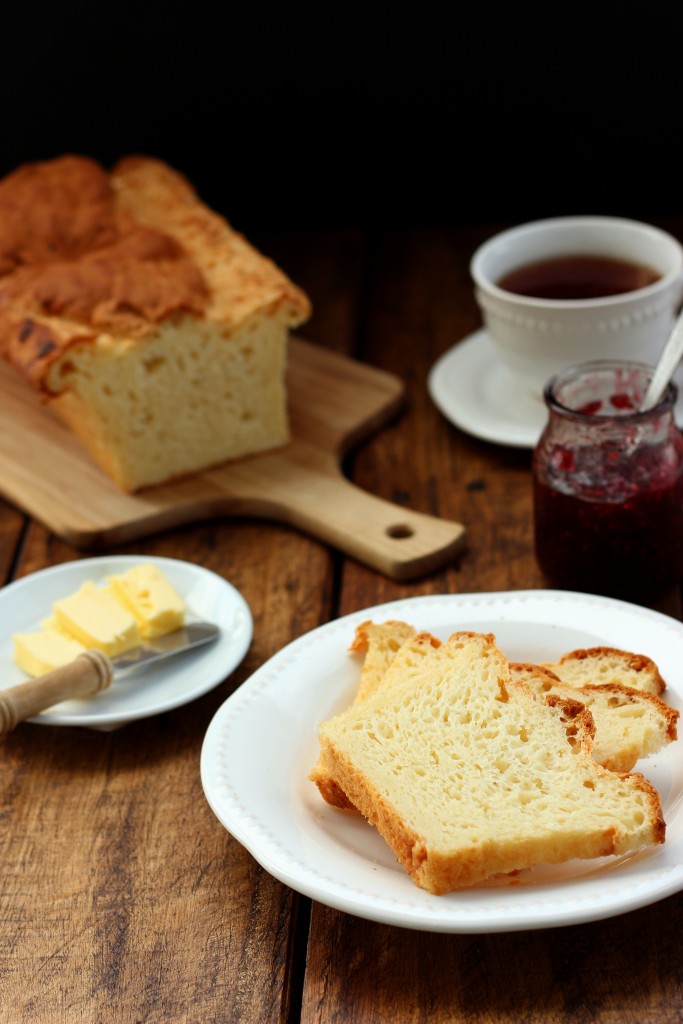
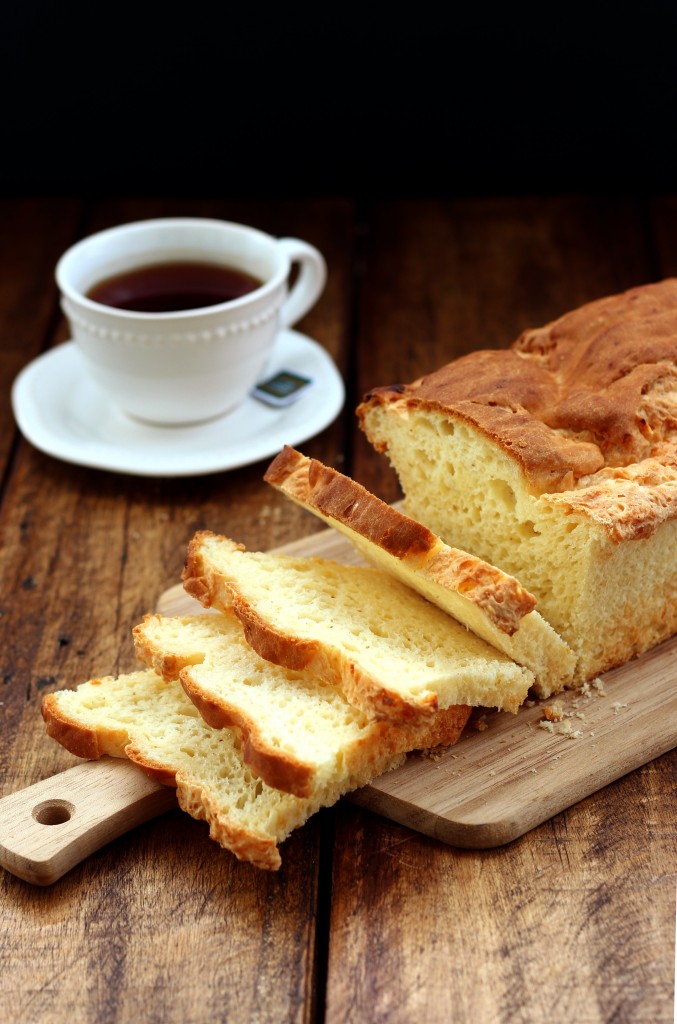
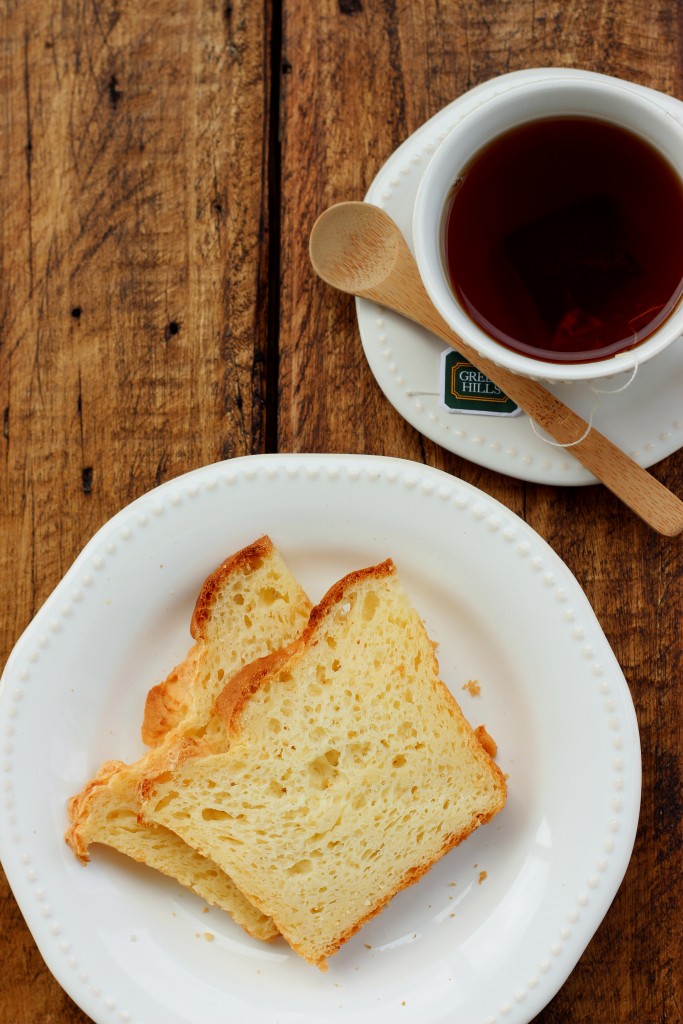
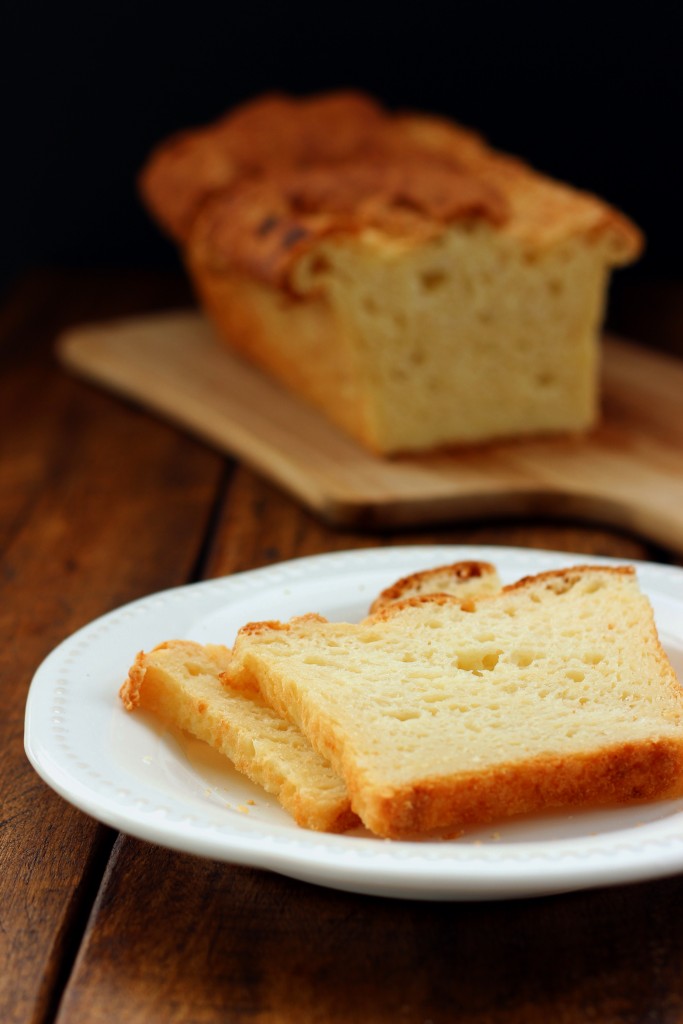
This is a recipe that tastes and looks like normal bread! It’s a gluten-free recipe that doesn’t have to be toasted to be eaten, isn’t tough, and best of all, produces a lovely loaf of homemade bread!
You see, baking gluten-free bread is not the same as baking normal wheat bread – the fundamental reason being that the former’s ingredients do not contain gluten – the special ingredient that is necessary to give bread its elasticity and allows bread dough to rise when combined with yeast. Xantham gum is used in gluten-free recipes to replace gluten, but still, most gluten-free bread recipes just aren’t good.
The general compliant by celiacs or people who choose a gluten-free lifestyle, is that it is almost impossible to find good gluten-free bread. Even store-bought loaves are dry and tend to be tough to eat, and not to mention, these loaves can be quite expensive too!
I’m not celiac and can tolerate gluten, but since choosing to live a mostly gluten-free lifestyle, I’ve been experimenting with gluten-free foods and grain-free foods (as you can tell from my blog). The one thing that had been frustrating me no end is that I hadn’t been able to find a good gluten-free bread recipe that I actually honestly liked.
My last few attempts at gluten-free bread produced rock-hard loaves that tired my jaws just from chewing them.
When I came across this recipe on Jillee’s blog, my heart literally skipped a beat.
Jillee showed pictures of her gluten-free loaf, and lo and behold, this was gluten-free bread that resembled real bread! Could it actually be true?
Juan, who is my principal taste tester, has always been pretty skeptical of gluten-free bread – which for him can never replace the real thing. When I casually mentioned to him the other day that I’d found a recipe that seemed like a miracle, he narrowed his eyes and said – “Ok, let’s try this, but this is the last gluten-free bread recipe we’re going to test. If it doesn’t work, please don’t bother trying anymore.”
Taking my chances, I made this bread last Thursday evening, crossing my fingers as tight as I could as I hoped and prayed for the bread to turn out fine.
I wasn’t hoping for the stars. Just for bread that was edible, not rock hard. Not something I could throw at the wall and have it bounce back at me.

I followed the recipe almost to the letter, with the exception of using white rice flour instead of brown rice flour, which I didn’t have. Since this was not my first time testing out gluten-free bread recipes, I knew that it was normal for the bread dough to resemble thick cake batter, and that it was necessary to leave the dough like that, instead of adding more flour (which I did previously).
I waited as patiently as I could as the bread dough rose (while twiddling my thumbs and watching Criminal Minds) and then placed the loaf pan in the middle rack of the oven, as instructed, and waited some more as the oven worked its magic.
Jillee had stated that it was absolutely necessary for the bread to completely cool before slicing it, if not, it may be flattened when you cut it. So, since I was banking all hopes on this one loaf, I waited one whole night for good measure.
You can imagine my anxiety and anxiousness to cut into the loaf the next morning, my heart gripped with apprehension and fear.
When I finally did slice the bread, I literally jumped for joy! Since I was alone at home at that point, the first thing I did was the take a photo of the bread slices and send it to Juan, attaching the picture with the message “Real bread, at last!”. He texted back immediately – “AMAZING!”

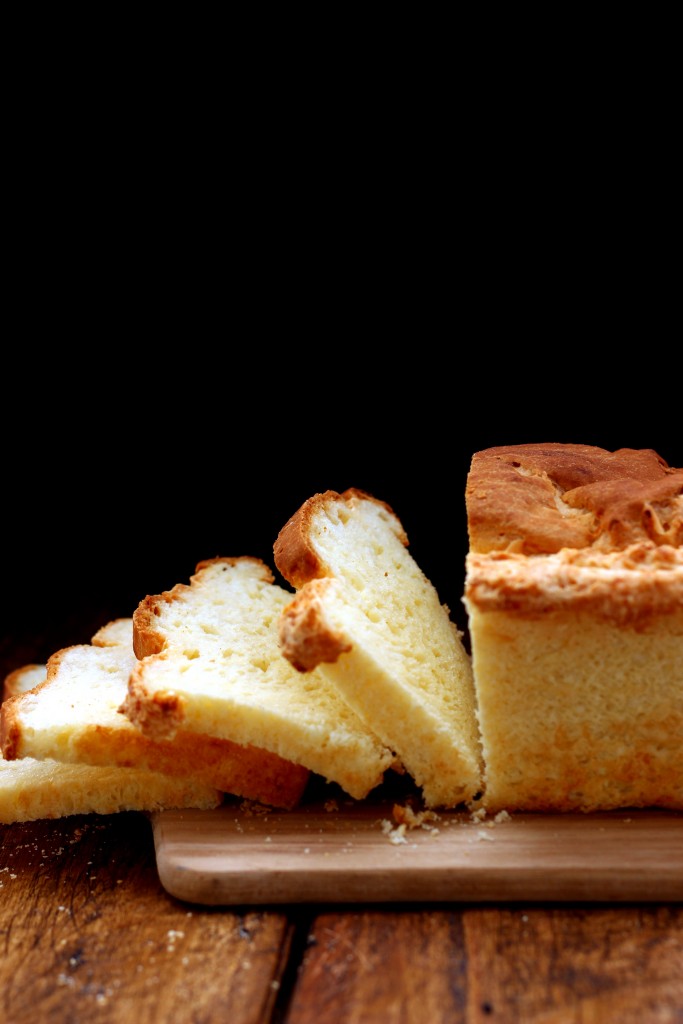
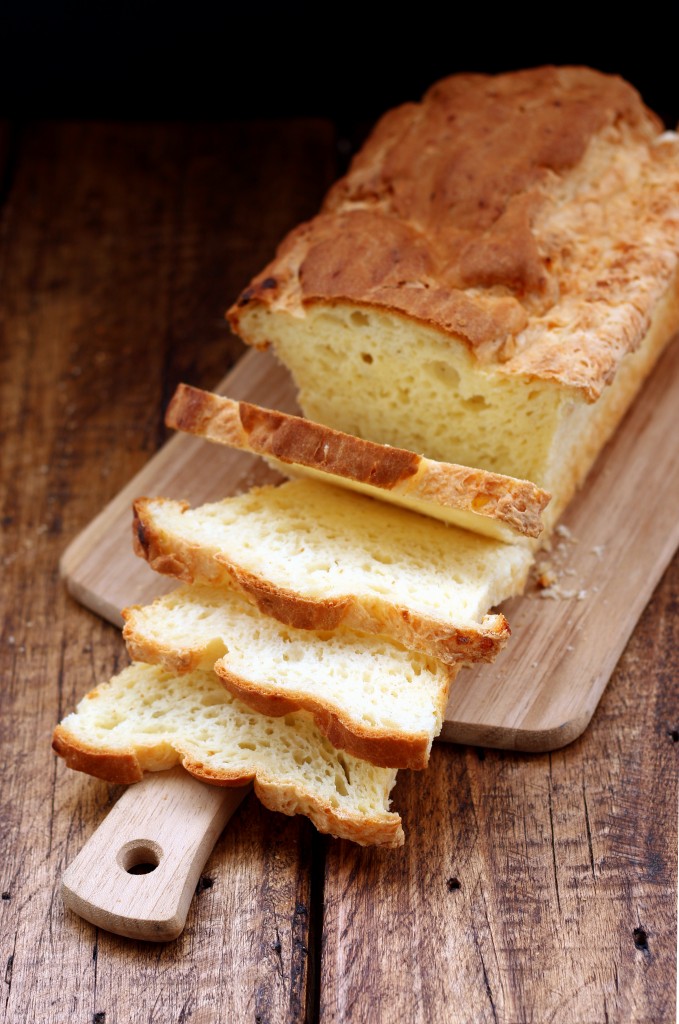
This bread looked really good (it was white on the inside, brown on the crust, and had air holes that gave it its sponginess.) I peered at it, then poked at it, marveling at its flexible, bendable texture. I folded it into half and gasped (it didn’t break!!).
Now for the real test – I tasted the bread on its own just to have an objective point of view (it tasted neutral, normal!).
YES! Gluten-free bread that didn’t have to be toasted to be edible!
I’m doing my little dance again!!
I couldn’t wait to share it with the rest of you, because I know there are so many celiacs out there and people who cannot tolerate gluten, but who still miss bread in their lives.
To you folks, I’m telling you – Say hello once more to sandwiches, French toast and all things bread again!
So here you go, make this recipe today, have a huge sandwich, and enjoy!
Amazing Gluten-free Sandwich Bread
- Total Time: 2 hours
- Yield: 10 1x
Description
Gluten-free bread that is soft, white, and tastes just like normal bread! Hip hip hurray for a gluten-free bread recipe that finally works!
Ingredients
- 1 1/3 cup of white rice flour
- 1 1/3 cup of tapioca flour/starch
- 1 1/3 cup of corn flour
- 1 tablespoon of potato flour
- 1 tablespoon of xantham gum
- 1 tablespoon of baking powder (or gluten-free egg replacer)
- 2 teaspoons of salt
- 1/2 cup of powdered milk
- 3 large eggs, room temperature
- 1/4 cup butter, room temperature
- 2 teaspoons of apple cider vinegar
- 1/3 cup of honey
- 2 1/4 teaspoons of dry active yeast
- 1 teaspoon of sugar
- 2 cups of warm water (make sure water is warm, not hot.)
Instructions
- Butter a large bread loaf pan well
- Combine the yeast, sugar and warm water together, mix well, and let it activate.
- In a medium-sized bowl, mix the rice flour, tapioca flour/starch, corn flour, potato flour/starch, xantham gum, baking powder, salt and milk powder together. Set aside.
- In another large bowl, add the eggs, butter, apple cider vinegar and honey, and mix well until combined. The butter will be chunky, but it’s fine.
- Add half the dry ingredients to the wet ingredients, and mix well until combined. Add the rest of the dry ingredients and stir well.
- Slowly pour in the yeast mixture, and stir all the ingredients together until you get a homogeneous bread dough that resembles very thick cake batter.
- Spoon the dough into the prepared loaf pan. Dip your fingers in water to smooth out the top of the batter. Set dough aside in a warm place to let it rise for 50 – 60 minutes.
- As dough is rising, pre-heat oven to 375 deg Fahrenheit (190 deg Cel).
- Once dough has risen to just slightly above the top of the pan, place loaf pan in the middle rack of the oven, and let it bake for 45 – 55 minutes, or until the bread’s internal temperature reaches 200 deg Fahrenheit. (I didn’t have a bread thermometer so I let it bake for 55 minutes to ensure the bread was fully baked).
- Remove bread from oven, and let it cool in the pan for 10 minutes, then remove from pan and place on a cooling rack.
- Allow bread to cool completely (at least 1-2 hours, preferable overnight) before slicing into it.
Notes
Recipes makes 1 large loaf, approximately 20 slices
Bread can be kept in an airtight container at room temperature for up to 3 days. (If you’re not planning to be eat it within 3 days, best freeze bread).
Barely adapted from One Good Thing by Jillee (http://www.onegoodthingbyjillee.com/2013/03/finally-gluten-free-bread-that-doesnt-suck.html)
- Prep Time: 1 hour
- Cook Time: 1 hour
- Category: Snacks
- Cuisine: Gluten-Free
Can this bread be frozen? Whole or pre-sliced? We pre-slice all our homemade bread for convenience. Changing our oldest child’s diet due to allergies. Restricting it even further out of desperation to get her eczema under control.
Hi Lisa! definitely go ahead and slice the bread before freezing it! 🙂 It works 🙂 I totally understand how difficult changing a diet due to allergies is, my bf has just been diagnosed with several food allergies (apart from being celiac) and we’re in the process of figuring things out!
Finally making the bread. Any reason it would not rise? More than 30 minutes in on a 60 minute timer and it is not rising. Maybe a little bit hardly at all. My yeast was fine and proofed without trouble. I used the egg replacer per Jillee’s recipe but it still should be rising. Not sure how long to let it rise before I just give up.
Hi Lissa, that’s really weird. At the end of the 60 minutes did your dough rise? Could you have used water that is too hot? Sometimes that may kill the yeast.
Just realized with my last reply I had two of the letter s in my name. Ooops. I temped my water and did the same warm temperature as I do with my regular breads. It was at about 108 degrees. The yeast proofed just fine. I let the dough go past the hour mark just a bit and it still had not risen. Baked it anyway and it is flat like a brick. No clue yet how it taste. Really need a bread that is more like a regular sandwich bread. I guess I should have read through all of the reviews for other people’s questions and answers as well as looked at Jillee’s directions. I mixed everything by hand till it was the thick cake batter consistency. I wonder if it still did not get whipped up together long enough. I do have a stand mixer so when I get around to grinding my own rice flour and tapioca flour again we will have to try again. I don’t use egg replacer very often so no clue how well it is supposed to work as a replacement either but I can only assume Jillee tried making it that way if she suggested the substitution for the eggs.
Hi Lisa, i’m sorry your bread didn’t turn out well. Really am. I honestly have never tried it with an egg replacer, I’m not sure if it was the fact that eggs are necessary in this recipe for it to turn out well, or if it was something else altogether. How about this, if you need a sandwich bread but don’t mind bread that doesn’t look like typical bread, I have some grain-free options that my readers love:
1) Flax Almond Bread (plenty of fibre, easy to make, great toasted too!)
2) Rosemary Almond Bread (savory, moist and great toasted)
3) Coconut Cashew Bread (love this one plenty! so easy to make & great toasted for sweet or savory toasts)
4) Multi Seed Bread (denser but delicious anyway)
Hope this helps!
I too moved to Buanos Aires for love some years ago 😉 I’m back in the States now but I’m glad I had that experience. LOOOOVE this recipe!!! Made it twice already and it came out great. It deflated a tiny bit but that wasn’t a big deal. The texture and flavor were still delicious. My only question is how do you store it? I’m afaid of putting it in the fridge because it might get hard and dry but don’t love the ifea of just leaving it out… Any advice? Thank you!
Hi Gina! So cool to hear about someone else that also moved to BA for love. Which part of the States are you in now?
Glad that you like this recipe 🙂 Storing gluten-free bread is never easy… but I would suggest slicing the bread into thin slices and then wrapping the bread tightly in plastic wrap and freezing it (if you know you’re not going to finish it up within a few day). Then when you want to eat a slice, take a slice from the freezer and pop it in the toaster or oven to defrost!
Hope that helps!
Another question. Usually you add sugar with your water and yeast. Sugar helps to proof the yeast or whatever you call it lol Why does this recipe call for just water and yeast?
About the yeast – I followed the original recipe and it didn’t call for sugar. Although it does make sense to add sugar – I suppose you could add sugar – it shouldn’t make a big difference! Perhaps the bread might be a little sweeter.
I read the original recipe and your recipe. I, too, want to use white rice flour since I find baking with brown rice flour makes the end product gritty and gives it an after-taste. My question is… your recipe calls for it to make 1 loaf, and the original calls for it to make 2 loaves..both with same baking time. Wouldn’t 1 loaf require longer baking time? Could it be reason why it fell because you made it in 1 loaf? I want to try making this in next couple days. Thanks!
Hi Aline! Thanks for stopping by! Hmm.. I used a large loaf pan, and that was enough for the recipe – not sure if the bread fell in the middle cos of that.. But if you prefer, you can always divide the bread dough into two small loaf pans, so hopefully the bread doesn’t fall for you! Let me know how it goes, I’d love to hear from you!
Hi. I tried this recipe and the taste is great! The bread is moist, tastes like a biscuit and my wife loves it.
However, both times I made it, the bread seems to deflate once I pull it out oven the oven. Any thoughts?
Hey Nick.. hmm, I believe my bread also deflated when I pulled it out of the oven.. Not sure how to change the outcome! I’m glad that at least you like the taste and that your wife loves it! 🙂
I wondered when I read the recipe if you were supposed to use a mixer or what. You just said to “mix it well” and “stir it”. Also, when I set the bread to rise, I wondered if it was supposed to be covered or not so I went to Jillee’s blog and too late saw that I was supposed to mix this in a heavy duty mixer (my Kitchen Aide!) for 4 minutes after it was completely combined by mixer! I’m happy to say that this bread turned out excellent except it did deflate somewhat and I’m now wondering if that was because it didn’t get air incorporated in it like it would being mixed by a Kitchen Aide. You may want to rethink this recipe a little, but it IS very tasty! I still don’t know, however, whether you’re supposed to cover or not. Thanks!
Hi Cheridal, thanks for stopping by and for your feedback! yes, you’re supposed to cover the bread with a damp towel when it’s set to rise. As for stirring the mixture, I used a hand beater to stir it since I don’t have a kitchen aid or heavy duty mixer. Glad you find the bread tasty! 🙂
I forgot to mention that your blog is beautifully done and very enjoyable to look at! Thanks for trying all these GF recipes for us! I’ll be a follower for sure!
Thank you so much Cheridal!! It makes me so happy to hear that!! 🙂 Hope to see you around again soon 🙂
Potato flour and potato starch are very different, but your recipe lists them as an interchangeable ingredient. Which did you use in your successful loaf of bread?
Hi Mary, nice to meet you! Thanks for pointing that out! It should be potato flour (I double-checked with the original recipe). I’ve also made the changes in the recipe at the bottom of the post! Hope you enjoy your loaf if you make it!
Hello,
The corn flour in the recipe…is it cornstarch? or corn meal? I have corn starch, I have corn meal heck I even have corn flour that I bought in an Asian store, which I haven’t opened yet.
Thank you.
Hi Menaka, I believe you can use either cornstarch or corn flour. I used cornstarch (i think the original recipe called for corn flour), and the bread turned out great with corn starch.
Let me know what you use in the end and how the bread turned out!
What can use instead if corn flour allergies to corn
Debby
Hi Debby, I believe you can use normal flour or rice flour if you are gluten-free.
I made this bread yesterday afternoon and let it rest overnight. It is GREAT!!!! Super moist and absolutely delicious. I have never baked gluten free bread before and I am glad that this turned out well, so I have a reason to use the gigantic box of dry milk that I am currently in possession of.
Yes! I know when I made this gluten-free bread I was really crossing my fingers that it would turn out moist!! And it was a miracle!! Glad you found a way to use that dry milk powder!
This will be my first attempt at gluten free bread, the pictures look amazing and so does everything else on your site.
Charlene
Hey Charlene! Nice to meet you and to discover your food blog! Such a cute story of how you started food blogging, and interesting introduction to Rastacook! Thanks for dropping by and I hope that you’ll like the gluten-free bread if you do make it! Sending love from Buenos Aires!
hi Felicia, i live in Germany and i never heard of xantham gum and i doubt i can find it here. Will it effect my bread if i skip xantham gum? or do you any substitute for it ? It looks tempting i want to try my hands on it! Thank you for sharing your recipe.
Hi Guna, I’m sure you should be able to find xantham gum in natural food stores – or special diet stores. It is necessary for gluten-free breads as its provides a similar effect to gluten. I googled and I think it’s called “Xanthan” in German.
Thank you Felicia. I’ll go ask the pharmacy store here and i hope i don’t raise their eyebrows for asking Xanthan LOL.
Hope you manage to find it! Let me know how the bread turns out if you do!
I am a gluten-loving person, but after reading your post, I think I might just try making this bread. It looks so good! Pinning. Thanks for sharing the recipe!
Thanks for pinning Thao! Yes, I love gluten too, but this bread makes me do a double take! It really is much softer than most gluten-free breads, and is great with jam or whatever you wish to eat it with!
I’m SO making this recipe Felicia! Gluten free bread has never looked so good, you’re pics are sensational! What brand of tapioca flour did you use?
Paula!! Gracias!! and make this! Best gluten-free bread I’ve tried! The tapioca flour I used was from a normal dietetica 🙂